Monday, September 12, 2022

Validate Your Sitecore Serialization Using Pre-commit Git Hook

 This is a copy of my blog post originally posted here to keep all things in one place.

How often do you push broken Sitecore serialization with your commits? If the answer is "never" then I envy you, you are a very neat developer! Then how often does someone in your team push broken serialization? I don’t believe that on second question answer will be "never". Depending on the size of the project and the intensity of work, it will definitely happen from time to time. Let’s figure out how to prevent it.

Git has the ability to add hooks. Hooks are programs you can place in a hooks directory to trigger actions at certain points in git’s execution. There are many of points, where we are able to include our programs(scripts): applypatch-msgpre-applypatchpost-applypatchpre-commitpre-merge-commitprepare-commit-msgcommit-msgpost-commitpre-rebasepost-checkoutpost-mergepre-pushpre-receiveupdateproc-receivepost-receivepost-updatereference-transactionpush-to-checkoutpre-auto-gcpost-rewritesendemail-validatefsmonitor-watchmanp4-changelistp4-prepare-changelistp4-post-changelistp4-pre-submitpost-index-change. Seeing this big list of hooks you may understand, that it is possible to add your custom logic only everywhere in the Git execution process. It is like events or pipelines in Sitecore: places, where you can extend existing logic according to your needs. Despite of big list of hooks, they are not too popular. The major part of projects will have either no Git hooks, or you may have hooks that run linters or force you to follow a certain commit message format.

Recent Sitecore versions provide powerful Sitecore CLI. This CLI includes work with serialization. And we are interested in the validation of serialization. Now, in order to check if Sitecore serialization saved on disk is valid, you don’t even need Sitecore runtime. You can do it by running one command dotnet sitecore ser validate. Let’s add it to Git pre-commit hook to avoid our team members pushing broken serialization to git.

  1. You need to download this Gist.
#!/bin/sh
# Pre-commit Git hook
# It runs Sitecore CLI Serialization check
# And doesn't allow to perform commit if serialization is broken
validate=$(dotnet sitecore ser validate)
regex_errors="Errors were detected"
count=$(echo "${validate}" | grep -c "${regex_errors}")
if test $count -gt 0
then
	echo "Sitecore serialization errors were detected"
	echo "Please run 'dotnet sitecore ser validate'"
	echo "And fix all errors before commit"
	exit 1
else	
	exit 0
fi
  1. Then you need to put it into .git\hooks directory with name pre-commit
  2. Now, before making a new commit, serialization validation will be executed. And if something is wrong with serialization, you will not be able to make a commit. You will get an error message:
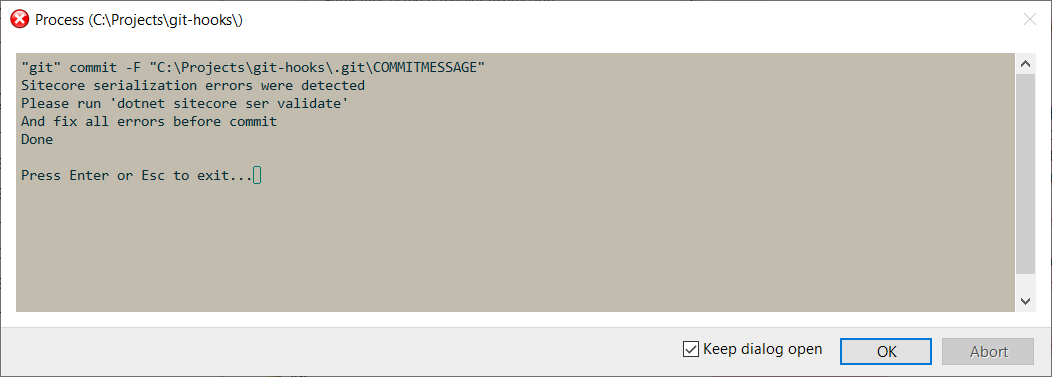
Git Hook in Action

After fixing serialization issues, you should be able to move forward. And now you may be confident that no one in your team will be able to push broken serialization and block someone else’s work.

Git hook will be a good option until you don’t have a huge amount of serialized items. It will work fine until running dotnet sitecore ser validate is fast. But if it will start to take more than a few seconds it may start to annoy developers. What you can do in that case? You will need to incorporate validation into your CI pipelines. You may run it on each pull request to make sure that no one will be able to merge broken serialization to the main branch.

Tuesday, September 6, 2022

Covering Sitecore Dianoga Module with Integration Tests

 This is a copy of my blog post originally posted here to keep all things in one place.

 Dianoga grew over time. There were added different image formats, different strategies, logging, additional settings like path exclusion, etc. And all these things are configurable. You can turn them on and off and achieve the behavior that you want. In 2022, there are 15 configuration files. I decided to add new file format support, but the number of different configurations scared me. How to test all of them and be sure that everything works? How quickly reproduce the reported issue?

The answer is automated testing. One of the most valuable things in covering your code with tests is that you are not afraid to change it.Dianoga has already some unit test coverage.

But as Dianoga modifies Sitecore behavior, even 100% unit tests code coverage doesn’t guarantee that everything every time will work. It could be checked with integration tests. Integration tests require running Sitecore. We don’t want to have an infrastructure for it. Fortunately, we can easily run Sitecore in Docker containers. The only one thing is required: quick and easy ability to add Dianoga module to your Sitecore container. And that was the one of reasons for the creation of Dianoga Asset Image.

How does it work:

  1. Integration tests are located in the integration-tests folder of Dianoga sources.
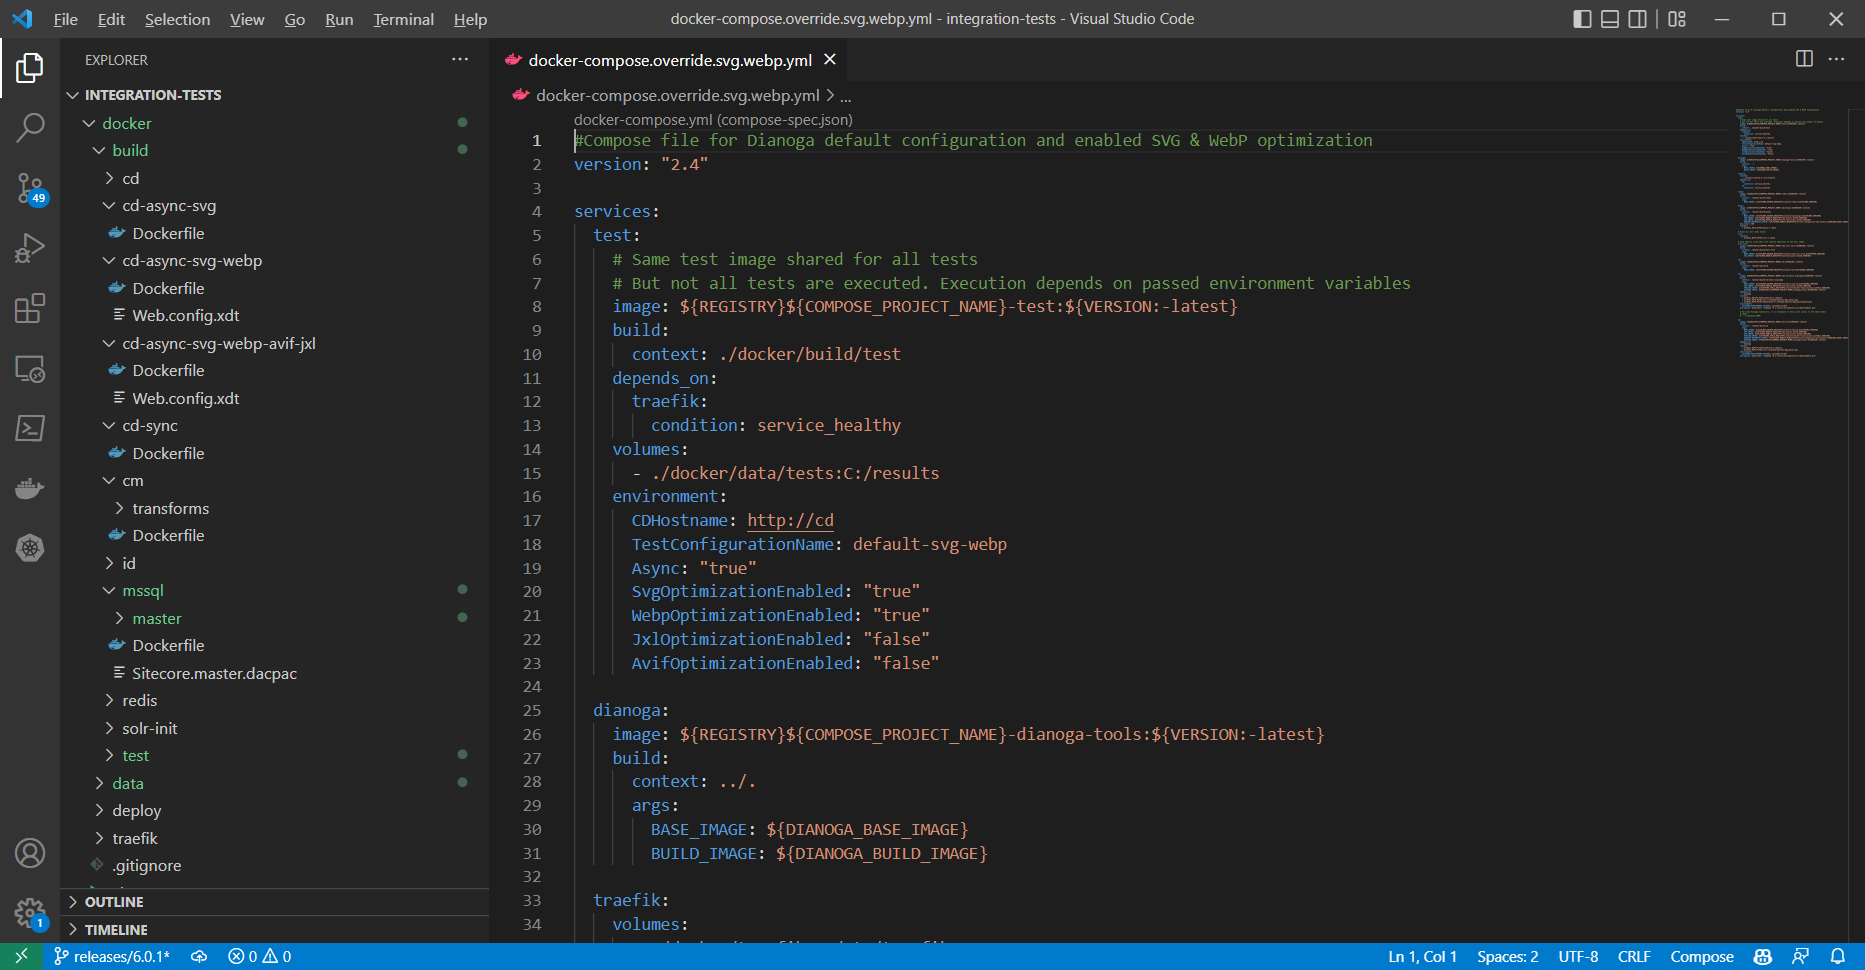
  2. We have different docker-compose configurations: for sync mode, for async mode, with enabled SVG, with enabled SVG and WebP, with enabled SVG/WebP/avif/jpegxl.

visual studio code: docker-compose.yml

  1. You can easily add a new configuration if you need to run a specific test to reproduce some issue
  2. We have a few test pages with a number of images on them.
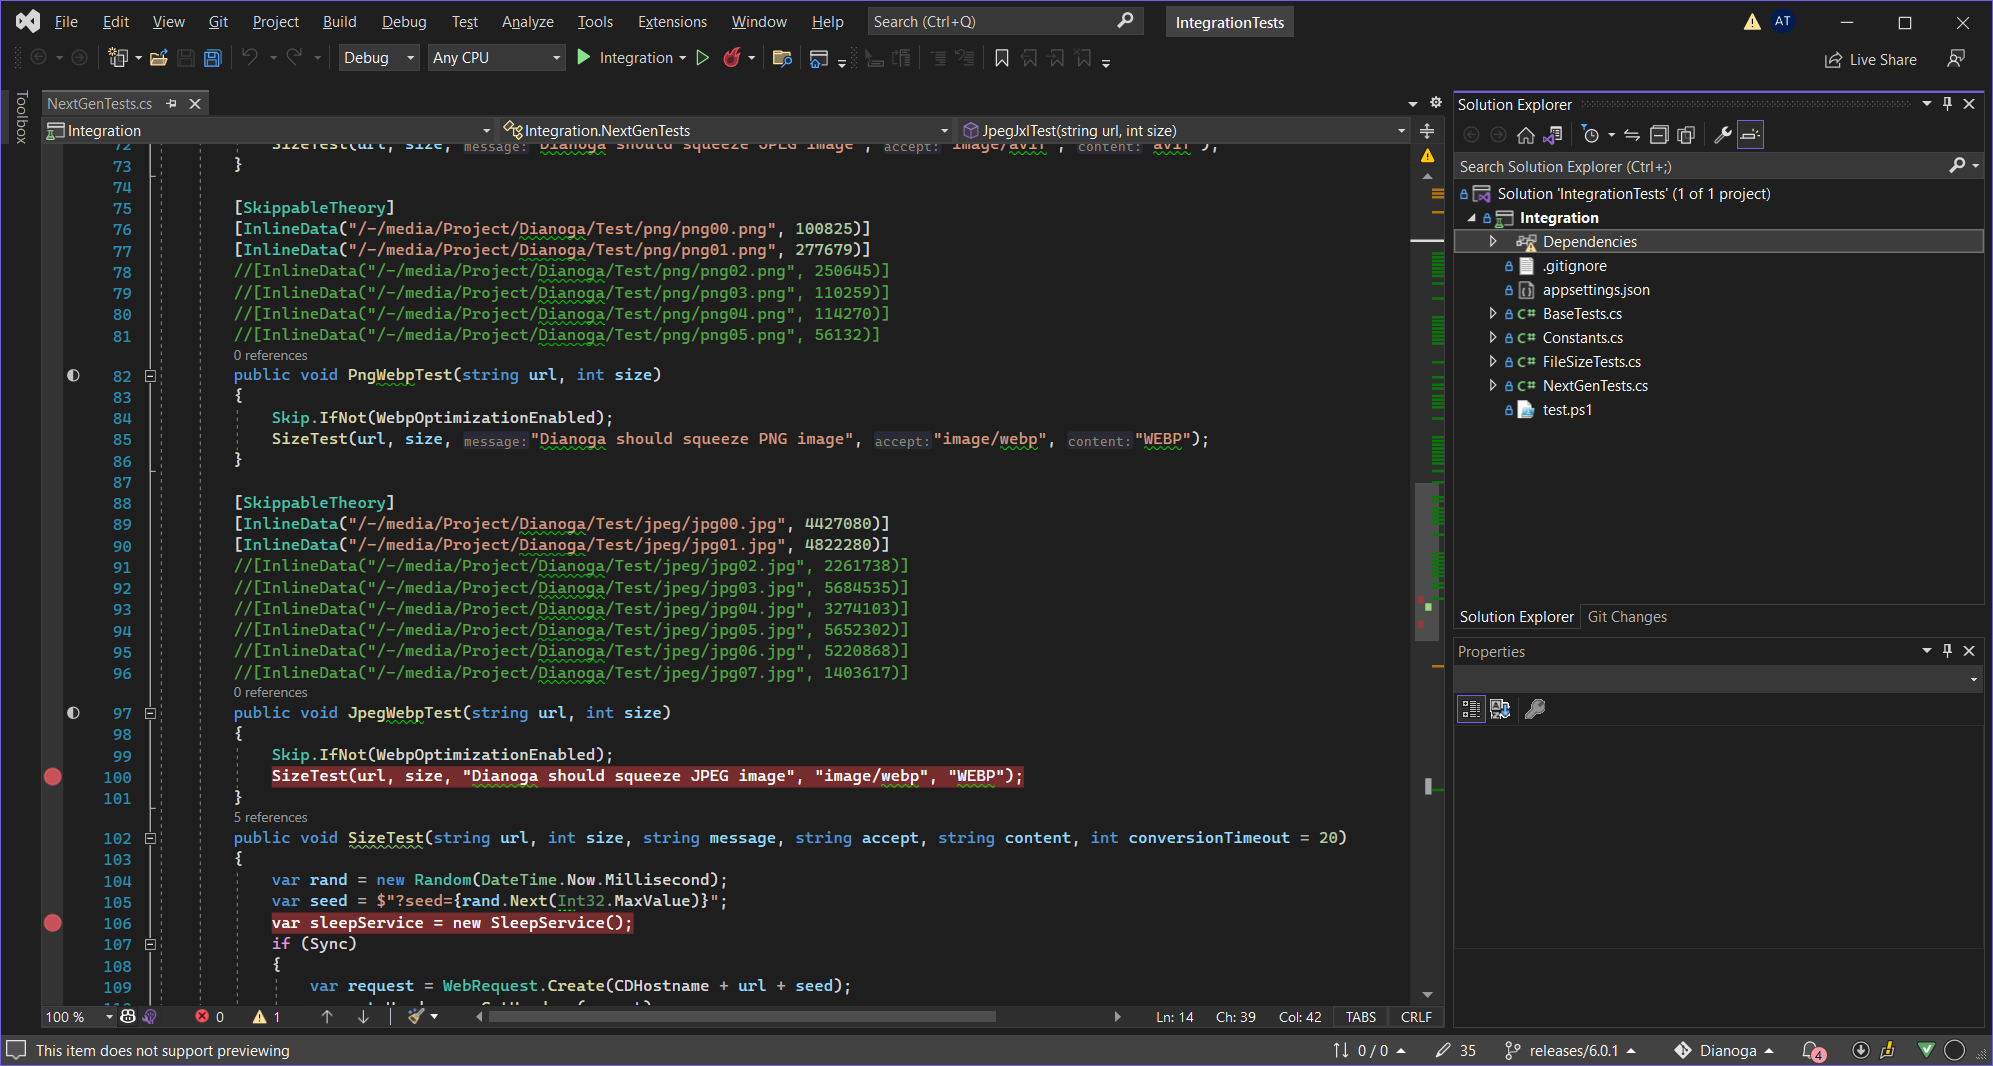
  3. We have test container. It runs .net core tests project. This project makes requests to Sitecore containers and verifies that Dianoga module squeezes images as expected.

visual studio: integration tests project

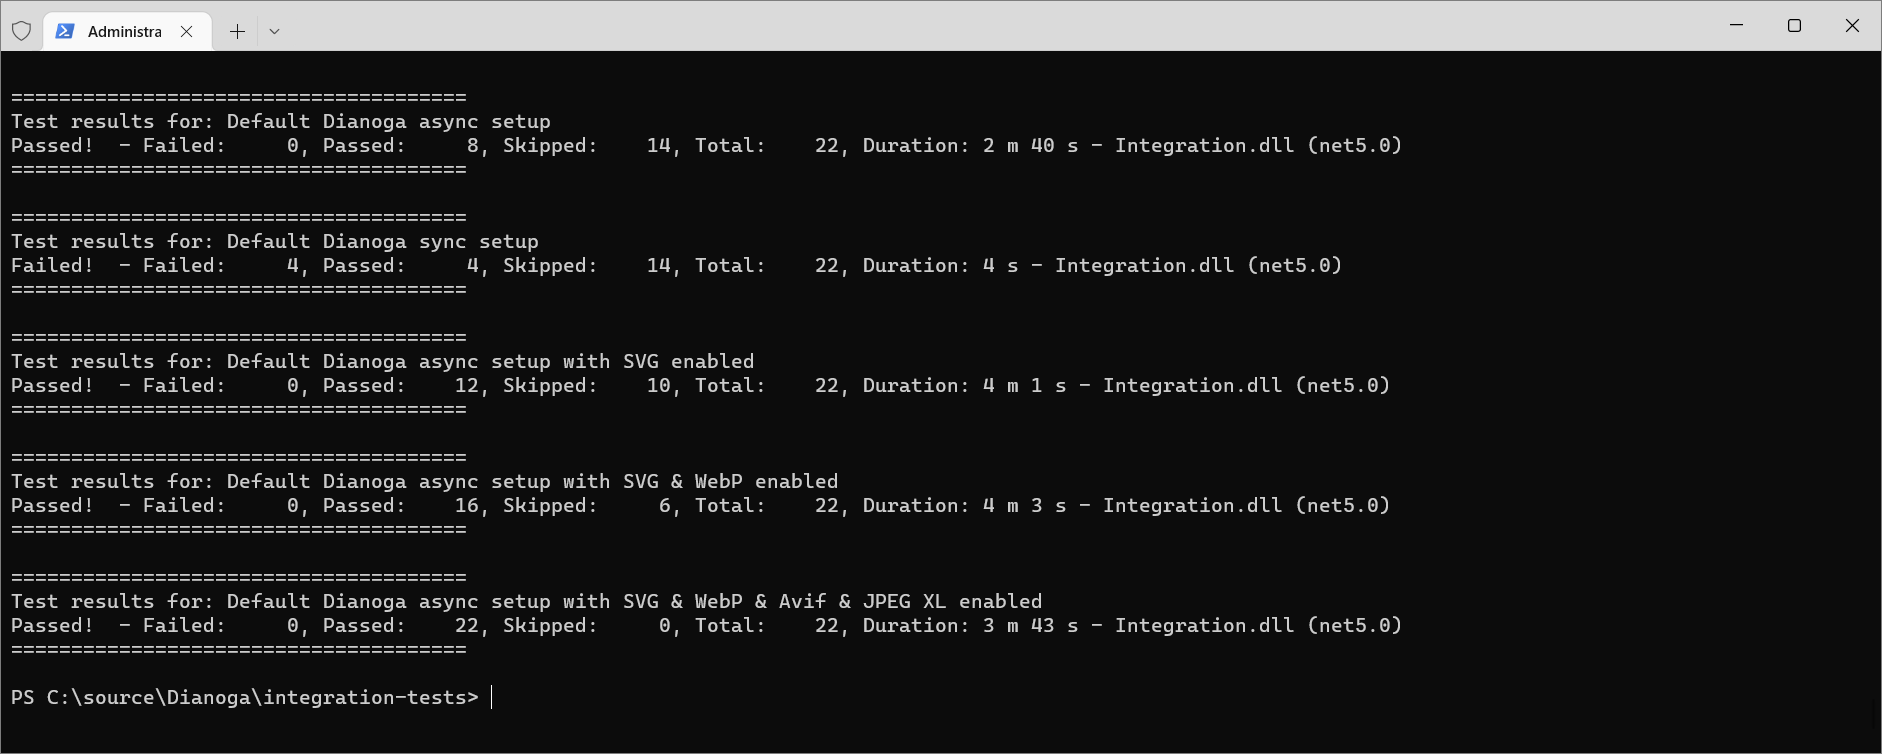
  1. We have Powershell script run-tests.ps1 that runs Docker configurations one by one and gather test results.
  2. All test results are saved to integration-tests\docker\data\tests folder

Sample results output

powershell: tests output

Conclusion

Running all these tests takes some time. But it saves a huge amount of time when you made some changes in your code and you want to make sure that all configurations still work as expected! Also, it become much easier to troubleshoot reported issues. You are able to set up a new Docker configuration and run a test to reproduce the issue. And as a bonus, you get examples, of how to configure Dianoga with different image formats and different strategies for your containerized environment.

Monday, August 29, 2022

Using Sitecore Dianoga Asset Image in Containerized Environment

 This is a copy of my blog post originally posted here to keep all things in one place.

We built Dianoga Asset Image in the previous article. Now, let’s figure out how to use it in your Docker setup.

The process of configuration Dianoga will be very similar to the process of configuration SXA or any other Sitecore modules. Because we built our image to have the same structure as Sitecore uses for their asset images. You will need:

  1. Open your docker-compose file
  2. Find the definition for cd instance
  3. Add argument
DIANOGA_IMAGE: ${REGISTRY}${COMPOSE_PROJECT_NAME}-dianoga-assets:${VERSION:-lates}

DIANOGA_IMAGE could be the image that you build by yourself, or you can use an image that I build using Github Actions. Actual version on current date is antonytm/dianoga-assets:6.0.1-net48-Release-8.

  1. Open your Dockerfile of cd instance
  2. Add next code:
...
ARG DIANOGA_IMAGE
...
FROM ${DIANOGA_IMAGE} as dianoga
...
WORKDIR C:\inetpub\wwwroot
# Add Dianoga module
# Install Microsoft Visual C++ Runtime, because image tools(e.g. pngquant.exe, avifenc.exe) depends on it.
RUN Powershell Set-ExecutionPolicy Bypass -Scope Process -Force; [System.Net.ServicePointManager]::SecurityProtocol = [System.Net.ServicePointManager]::SecurityProtocol -bor 3072; iex ((New-Object System.Net.WebClient).DownloadString('https://community.chocolatey.org/install.ps1'))
RUN choco install vcredist-all -y
# Copy files from Dianoga Asset Image to your website folder
COPY --from=dianoga \module\cd\content .\
...
# Optionally enable all configurations that you need, for example:
# Enable SVG optimization
RUN Rename-Item -Path C:\inetpub\wwwroot\App_Config\Include\Dianoga\Dianoga.Svg.config.disabled -NewName Dianoga.Svg.config
# Enable WebP optimization
RUN Rename-Item -Path C:\inetpub\wwwroot\App_Config\Include\Dianoga\z.01.Dianoga.NextGenFormats.WebP.config.disabled -NewName z.01.Dianoga.NextGenFormats.WebP.config
# Enable AVIF optimization
RUN Rename-Item -Path C:\inetpub\wwwroot\App_Config\Include\Dianoga\z.02.Dianoga.NextGenFormats.Avif.config.disabled -NewName z.02.Dianoga.NextGenFormats.Avif.config.config
# Enable JXL optimization
RUN Rename-Item -Path C:\inetpub\wwwroot\App_Config\Include\Dianoga\z.03.Dianoga.NextGenFormats.JpegXL.config.disabled -NewName z.03.Dianoga.NextGenFormats.JpegXL.config

# If you want to use webp/jpegxl/avif, you need to make changes in your web.config file
# Change default Media Request Handler to be able to use NextGenFormats
COPY Web.config.xdt ./Web.config.Dianoga.xdt
RUN Powershell C:\tools\scripts\Invoke-XdtTransform.ps1 -Path Web.config -XdtPath Web.config.Dianoga.xdt

and web.config.Dianoga.xdt itself:

<?xml version="1.0" encoding="UTF-8"?>
<configuration xmlns:xdt="http://schemas.microsoft.com/XML-Document-Transform">
   <system.webServer>
      <handlers>
         <add verb="*" path="sitecore_media.ashx" name="Sitecore.MediaRequestHandler" xdt:Transform="SetAttributes" xdt:Locator="Match(name)" type="Dianoga.NextGenFormats.MediaRequestHandlerXA, Dianoga" />
      </handlers>
   </system.webServer>
</configuration>
  1. Run docker-compose build
  2. Run docker-compose up

That is all. Now you don’t need to include Dianoga as a NuGet package for your project.

Friday, July 29, 2022

Building Sitecore Dianoga Docker Asset Image Using GitHub Actions

 This is a copy of my blog post originally posted here to keep all things in one place.

 We figured out with Sitecore Docker Asset Images. And we build our own ones for Dianoga. Now, it is time to automate it's buildind and push this image to Docker Registry.

I hate to build anything manually. Especially, I hate the moment when you just finished building everything, but you need to make one small change and rebuild everything. That is frustrating. Fortunately, there are many different tools for CI/CD. And many of them are free for open source. Previously I preferred to use Appveyor for my open-source projects. In my opinion, it is the most friendly CI system for .Net developers. I made and automation of building Sitecore packages. And I used it for a few my packages. But nowadays, GitHub Actions become much more powerful. That is why it is possible to keep everything on GitHub. And avoid zoo of services for different purposes.

There is an official GitHub Action to build and push Docker images. But it will not work for us. It doesn’t support the build of Windows-based images. Someday, it probably will support it, but taking into account that ticket was opened on the 23 of March 2020 year, there are quite small chances that it will happen someday.

But GitHub Actions have windows-2022 and windows-2019 runners that include Docker. It means that it should be possible to build Windows-based Docker images using Github actions. It could be done in 2 ways. Either run Docker commands by yourself. Or use Docker Build & Push Action from the community. I decided to select the usage of community action to save some time. But there are no limitations to running all Docker commands by yourself.

Dianoga has support of different .Net versions: 4.8, 4.7.1, 4.6.2, and 4.5.2. (You may say, that 4.5.2 is for the old Sitecore version and you will never use it with containers. And you will be absolutely right.) Also, there are 2 build configurations: Release and Debug. Combinations of .Net version and build configuration give us multiple Docker Asset Images. We definitely don’t want to build and push them manually. It is long and boring.

It gives us an understanding, that we need to introduce 2 variables ${{ env.BUILD_CONFIGURATION }} and ${{ env.DIANOGA_DOTNET_VERSION }}. But all other build logic could be shared ./.github/actions/publish-docker-hub

name: Dianoga Docker CI, .NET 4.8, Release
on:
  push:
    branches: [ feature/docker ]
env:
  BUILD_CONFIGURATION: Release
  DIANOGA_DOTNET_VERSION: net48
jobs:
  build:
    runs-on: windows-latest
    steps:
      - name: Checkout code
        uses: actions/checkout@v2
      - name: Run custom action
        uses: ./.github/actions/publish-docker-hub
        with:
          build_configuration: ${{ env.BUILD_CONFIGURATION }}
          dotnet_version: ${{ env.DIANOGA_DOTNET_VERSION }}
          username: ${{ secrets.DOCKERHUB_USERNAME }}
          password: ${{ secrets.DOCKERHUB_TOKEN }}

And here is what common part will look like:

name: "Publish to Docker"
description: "Pushes built artifacts to Docker"
inputs:
  build_configuration:
    description: "Debug/Release"
    required: true
  dotnet_version:
    description: "net45/net46/net471/net48/etc"
    required: true
  username:
    description: "Docker registry username"
    required: true
  password:
    description: "Docker registry password"
    required: true
runs:
  using: "composite"
  steps:
  - uses: mr-smithers-excellent/docker-build-push@v5
    name: Build & push Docker image
    with:
      image: antonytm/dianoga-assets
      tags: 6.0.0-beta.2-${{ inputs.dotnet_version }}-${{ inputs.build_configuration }}-${{ github.run_number }}, latest-${{ inputs.dotnet_version }}-${{ inputs.build_configuration }}
      registry: docker.io
      dockerfile: Dockerfile
      username: ${{ inputs.username }}
      password: ${{ inputs.password }}
      buildArgs: |
        BUILD_CONFIGURATION=${{ inputs.build_configuration }}, DOTNET_VERSION_ARG=${{ inputs.dotnet_version }}

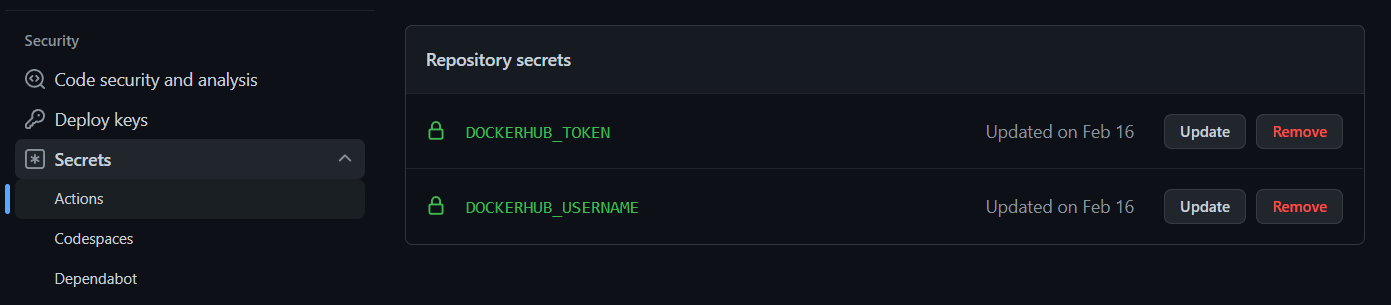
You man notice that we use 2 secrets DOCKERHUB_USERNAME and DOCKERHUB_TOKEN. They are configured at the setting of your GitHub project.

GitHub Secrets

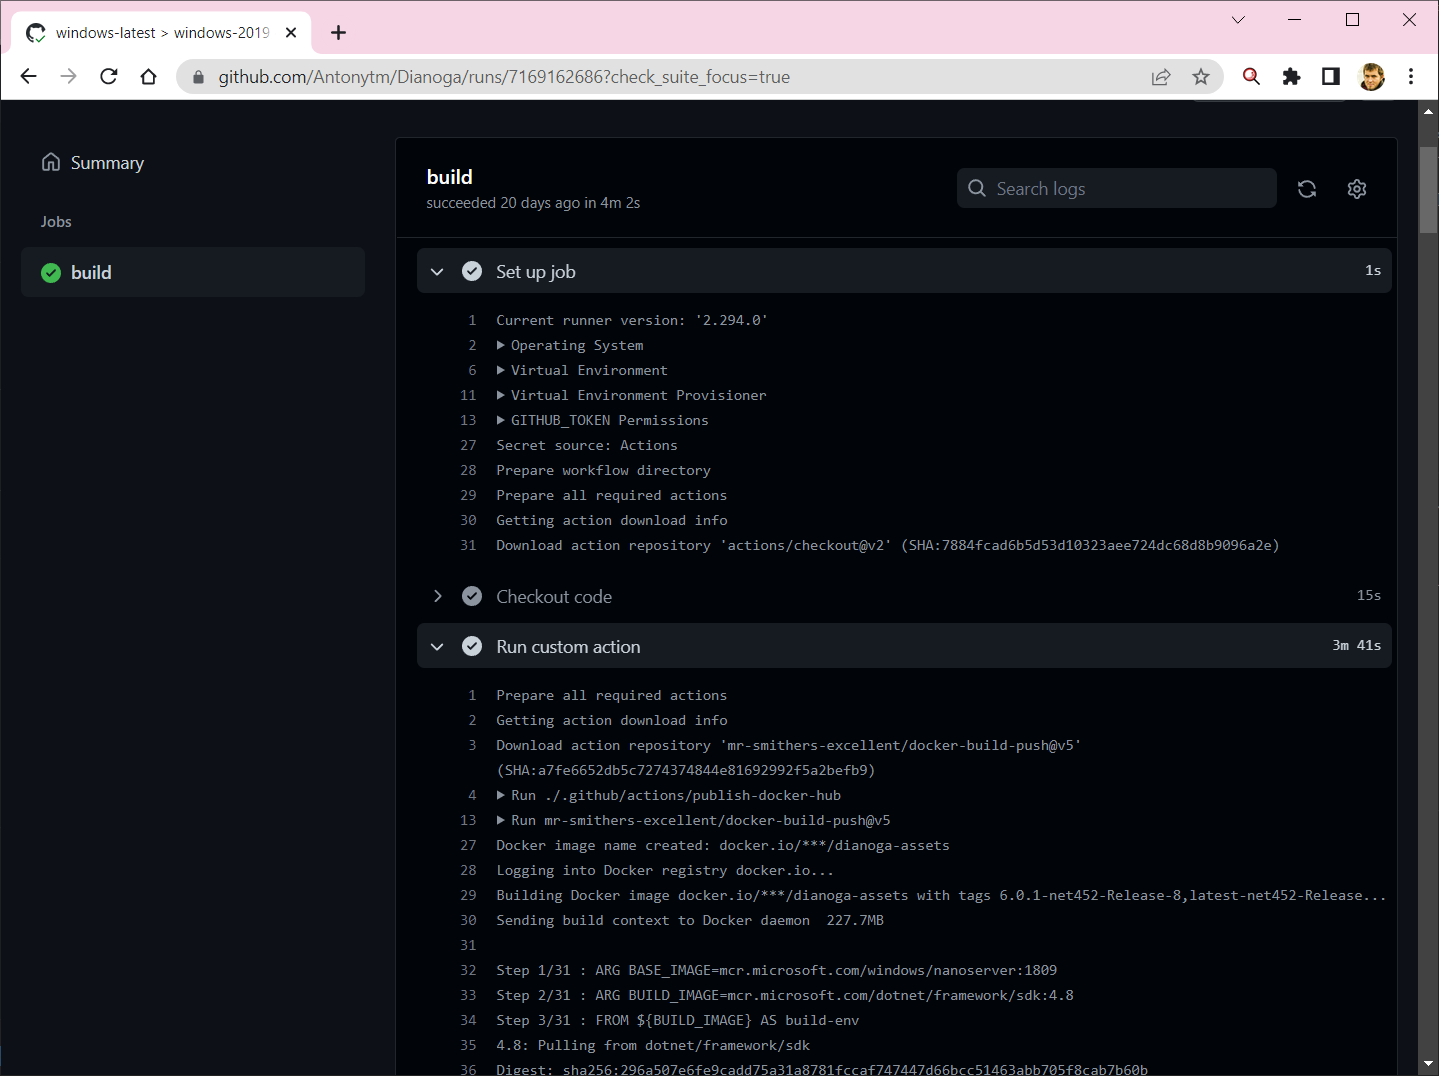
Now, everything is ready. We are able to build our Dianoga Docker Asset Image using GitHub action.

GitHub Actions

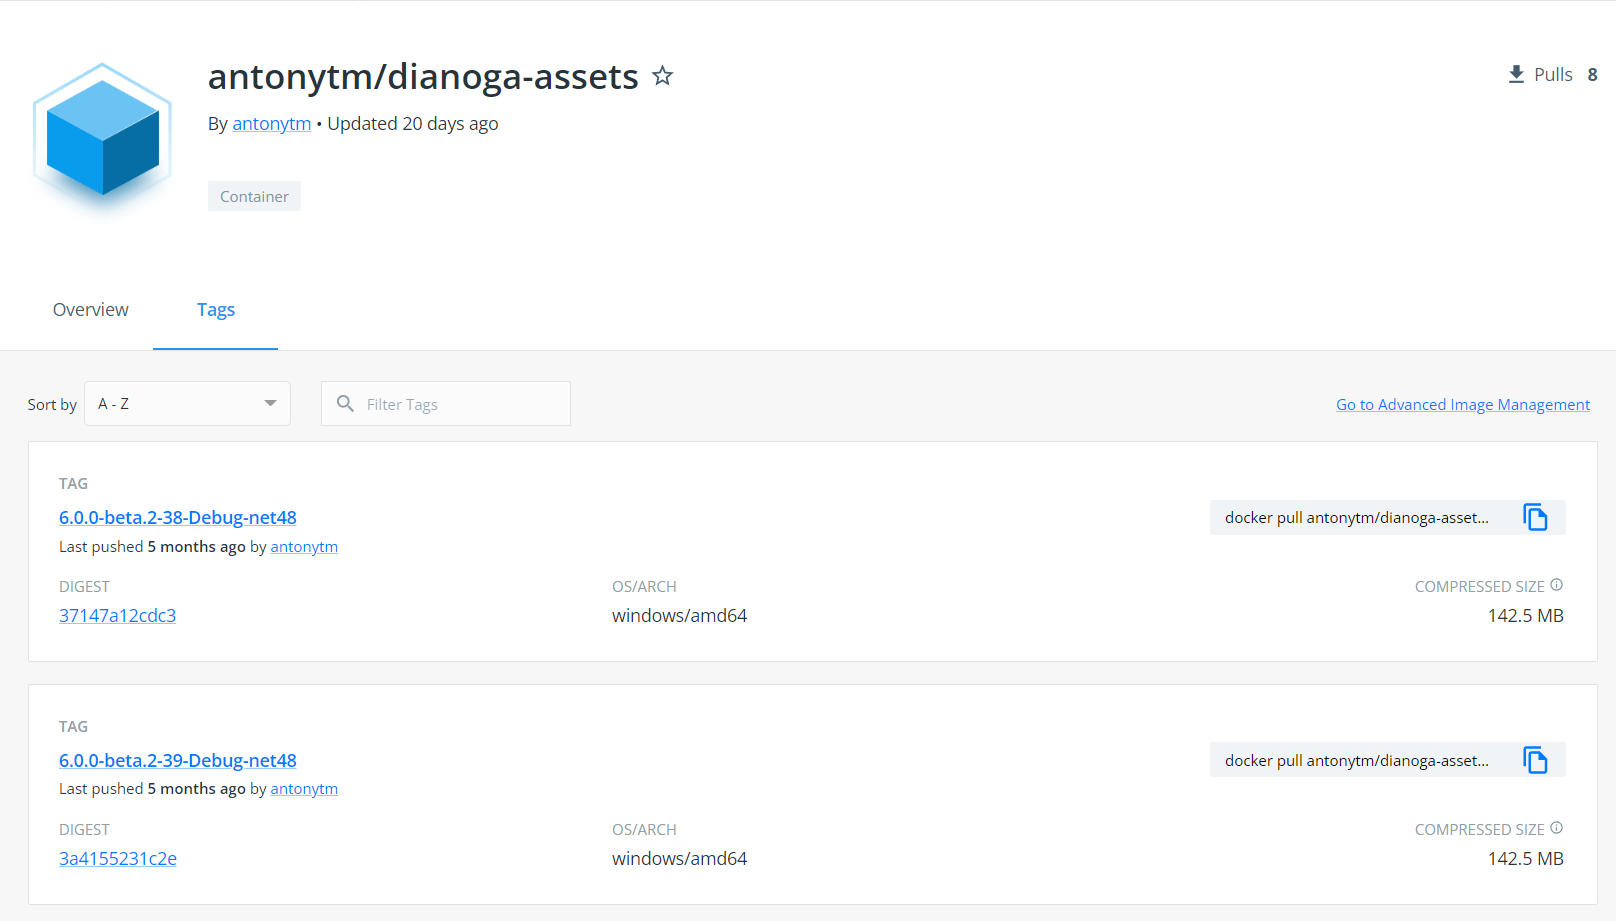
And we are able to see built images in the Docker registry.

Docker Registry

Sunday, July 24, 2022

Use Font Awesome or MUI as Sitecore Icons

This is a copy of my blog post originally posted here to keep all things in one place.

  If you read the title of the article, understand everything from the title, and you are impatient to try FA or MUI icons on Sitecore instance by yourself then you may
 download Sitecore packages on Github. But if you want the full story, grab a cup of tea and enjoy it below.

There are 8755 icons in the latest Sitecore version 10.2. But the major of icons was added a long time ago. They are still good and you can cover 95% of your needs. But when you need an icon for some brand(Azure, Amazon, Google), you are in trouble. Also if want an icon for something relatively new (NFT, Bitcoin, Coronavirus), you are also in trouble. There are no such icons. And sometimes, you just can’t find the right icon for your specific case and need to use another compromise icon.

I understand Sitecore. They need don’t violate property rights with brand icons. We, as website developers, don’t have so strict limitations as we implement the site on Sitecore and don’t sell it with brand icons. Also, Sitecore needs to keep backward compatibility. You, as a customer, don’t want to see an icon, that you used for your website, disappeared in the new version. Even if it is an icon for PCI Card Network. You should keep it, because someone may use it in their implementation. Also, adding a new set of icons increases mess. You already have almost 10k icons, almost for everything. Why do you need one more icon for a car? And it is impossible to make every customer happy. One set of icons will be suitable for a car dealer, but completely another for a hotel chain.

On the other hand, icon libraries become very popular in the last few years. If you are a web developer then you definitely had a project, where you used Font Awesome. Or if you make your website using Material UI, you probably used icons from this library. Why don’t use the same icons for the Sitecore backend? It will make content editors happy. All that we need is to convert icons from one format to another and make small Sitecore adjustments to be able to use new icons.

Sitecore icons are saved in PNG format, but all modern icon libraries have SVG format. The SVG format is a subset of XML, we can easily process these files, and change size and colors. And there are millions of tools for converting images from one format to another. I selected ImageMagick, it fully fits our needs.

Both FA and MUI icons are provided in one color. During processing, we are able to add as many colors as we need. I added 4 colors: blue, red, green, and black. But that could be easily changed. You may have fewer or more colors. You can use your brand colors as well to make everything look consistent.

How to use it?

  1. Read the documentation on GitHub
  2. Go to releases
  3. Download latest release package
  4. Login to Sitecore Desktop
  5. Open Development Tools > Installation Wizard
  6. Upload the package that you have downloaded
  7. Install it and enjoy FA and MUI icons on your Sitecore instance.

And that is why I love open source. You can grab a free set of icons, process them using free open source tools, host everything on GitHub, automate everything using GitHub Actions and share your results with others. You take something, you give something. Everyone is happy.

And Special thanks to Viet Hoang, who back in 2017 wrote an article about changing Sitecore icons that is still actual in 2022.

Thursday, July 7, 2022

Dianoga Docker Asset Image

 This is a copy of my blog post originally posted here to keep all things in one place.

Before reading this article, I do recommend you read
 about Sitecore Docker asset images. It will make understanding what is going on here much easier. Let's build our first Sitecore Docker Asset image.

Let’s create Dianoga Docker Image Asset for Sitecore.

Dianoga is a good candidate for start. It is well-known community module, which means that what we create will be used by others. It doesn’t have any items, it is easy to build the image. And it has many different configurations. Having the image may be used for integration testing and reproduction of bugs with non-standard configuration.

Each Docker image should have a base image. Let’s define what image will we use as a base. You need to remember that our image will be used only as a container of files. It makes sense to take the smallest image that is possible. It will be mcr.microsoft.com/windows/nanoserver:1809 for Windows images. (There is even a reserved scratch image in Docker, but that is designed for Linux images and it is a separate story)

ARG BASE_IMAGE=mcr.microsoft.com/windows/nanoserver:1809

But as the input to build the image, we will get only Dianoga sources. We need to compile them. And as we selected the base image smallest possible, we don’t have anything there to build C# project. That is why we need one more image: “build image”. It should contain all build tools that we need. For our case, it will be mcr.microsoft.com/dotnet/framework/sdk:4.8

ARG BUILD_IMAGE=mcr.microsoft.com/dotnet/framework/sdk:4.8
FROM ${BUILD_IMAGE} AS build-env

Dianoga could be built in 2 configurations: debug and release. Also, a different .Net version should be used depending on what Sitecore version, where we want to use it. It would be nice to put these values as arguments:

ARG BUILD_CONFIGURATION=
ARG DOTNET_VERSION_ARG=

Now, we are ready to build Dianoga project inside Docker containers.

First of all, we need to register Sitecore Nuget packages source

RUN dotnet nuget add source https://sitecore.myget.org/F/sc-packages/api/v3/index.json

Then copy all project and solution files and restore Nuget packages

COPY *.sln ./
COPY src/Dianoga/Dianoga.csproj ./src/Dianoga/
COPY src/Dianoga.Tests/Dianoga.Tests.csproj ./src/Dianoga.Tests/
RUN dotnet restore

After a successful package restoration, we may copy the whole project and build it

COPY src ./src
RUN dotnet build -c $env:BUILD_CONFIGURATION

After a successful build, we need to copy everything that we need from the “build image” into the “base image”.

RUN mkdir ./src/bin
RUN Copy ./src/Dianoga/bin/$env:BUILD_CONFIGURATION/$env:DOTNET_VERSION_ARG/Dianoga.* ./src/bin/
RUN Copy ./src/Dianoga/bin/$env:BUILD_CONFIGURATION/$env:DOTNET_VERSION_ARG/System.Threading.Tasks.Dataflow.dll ./src/bin/

FROM ${BASE_IMAGE}

# Copy Dianoga dll and pdb (if present)
COPY --from=build-env /src/bin/ ./module/cd/content/bin/
COPY --from=build-env /src/bin/ ./module/cm/content/bin/

# Copy Dianoga Tools
ARG src="/src/Dianoga/Dianoga Tools"
ARG target="./module/cm/content/App_Data/Dianoga Tools"
COPY --from=build-env ${src} ${target}

ARG src="/src/Dianoga/Dianoga Tools"
ARG target="./module/cd/content/App_Data/Dianoga Tools"
COPY --from=build-env ${src} ${target}

# Copy Configs
ARG src="/src/Dianoga/Default Config Files"
ARG target="./module/cm/content/App_Config/Include/Dianoga"
COPY --from=build-env ${src} ${target}

ARG src="/src/Dianoga/Default Config Files"
ARG target="./module/cd/content/App_Config/Include/Dianoga"
COPY --from=build-env ${src} ${target}

Dockerfile is ready and we can build the Dianoga Docker Asset Image

docker build . --build-arg DOTNET_VERSION_ARG=net48 --build-arg BUILD_CONFIGURATION=debug

Now we are ready to use the Sitecore Dianoga Docker image in our projects. It will be described in further articles.