Wednesday, June 13, 2018

Passing Sitecore Certified Platform Associate Developer

I passed  Sitecore Certified Platform Associate Developer exam. There are a lot of posts in the internet that describes topics and question that are present on exam. This post is not about it, furthermore it is not allowed. It is about technical issues that you can face(and I faced) during passing online exam:
  • Be very attentive to time that you select for exam. I selected 3 PM, but I got invitation on 2 PM. I was confused and was ready to pass it on 2 PM, but exam started at 3 PM. I think that this issue is related to daylight-saving time zones issue in http://webassessor.com system.
  • You can't check Sentinel Secure software before running exam. You should have backup plan if something will go wrong with your software/hardware.
  • Sentinel Secure software throws error on Windows server 2012
  • Sentinel Secure software doesn't work with all webcams. (I assume that issue is present for 4k cams)

You can ask me how I faced with all of these issues during passing exam:
  1. I tried to start exam on 2 PM, but it was unavailable until 2:50 PM
  2. I started exam on my laptop, but exam software was not able to see video from my camera. Video was black blank screen in application, however in other software camera worked as expected.
  3. I moved to machine with Windows server 2012 R2 installed. I was not able even to start exam application. After checking system it wrote "Error" with one option: exit.
  4. I moved back to laptop and tried different camera and fortunately it started to work.


Wednesday, May 30, 2018

Adding HtmlCache Viewing Feature to Sitecore.Rocks Visual Studio Extension

It is copy of my article placed in Sagittarius blog

After writing an article about viewing Sitecore HTML cache, I thought that it is not convenient to move custom code from one project to another. When, instead, there is ability to extend widely used existing Sitecore development tool Sitecore.Rocks then it should be done. I decided to contribute into it.

First of all, you need to fork Sitecore.Rocks project on GitHub.

    Sitecore.Rocks works like server-client application. You have server side (Sitecore.Rocks.Server, connector in other words) that is copied to all Sitecore websites and client side: interface in Visual Studio to display different things from Sitecore. Fortunately, there is already “Data” column for cache viewer to display cache details and we don’t need to modify interface to add something new. But this column shows only path to item, when cache key is Sitecore identifier. In all other cases Data column will be empty. Let’s extend amount of data that could be shown in this column.

     Logic that returns data to be displayed in this table located in /src/Sitecore.Rocks.Server/Requests/Caches/GetCacheKeys.cs file. We can modify it and add ability to return cache value when cache type is string or id:


    After building a solution, we need copy Sitecore.Rocks.Server.dll to bin folder of our website. Now, you are able to see what it inside cache. If you are interested in viewing other types of cache(not only string and id) then you are able to extend code above with your needs.


If my pull request is accepted, then this feature will be available in one of next Sitecore.Rocks version.

Friday, May 4, 2018

How to Check What is Inside Sitecore HTML Cache?

It is a copy of this blog post.

Sitecore has a lot of caches: AccessResultCache, DataCache, DeviceItemsCache, HTML cache, ItemCache, ItemPathsCache, PathCache, RegistryCache, RuleCache, StandardValuesCache, ViewStateCache, XslCache, FieldReaderCache and others. When you facing with caching issue on your website(something is either not cached, or cached but should not), it is important to have the ability to see what is present in cache.

All Sitecore caches consist of cache key and cache value. Cache key is always string. Cache value could be any type of object depending on cache. We can take as example HtmlCache cache. When you see what cache key you have and what data is there, you can better tune caching of controls, especially when you have custom(not out of the box) cache criterias (vary by IP, vary by country, vary by role, etc.) and a lot of controls on a page. Here is code snippet to get everything inside HtmlCache:
It requires using reflection due to private methods in HTML cache. The result of execution GetCaches method will be List<Tuple<string, string>>, that you can filter, make search or display on the page. It can save you a lot of time when debugging Sitecore caching issues. Here is an example of service page that displays cache keys and cache values:


If you can’t add this code to some secure page in your solution(you don’t want to do it or need some out of the box solution) then there are also other useful tools for troubleshooting issues with Sitecore cache. But they will not show you the cached value of HtmlCache entry:


Wednesday, April 11, 2018

Using WebP Format in Sitecore

It is a copy of this blog post to have all my articles in one place.
WebP is promising format that allows good optimization comparing to JPEG and PNG. According to tests it provides lossless images that are 26% smaller compared to PNGs and lossy images that are 25-34% smaller than comparable JPEG images at equivalent SSIM quality index.
This format becomes more and more popular over the web nowadays. Google promotes WebP format, it released WebP as open source to allow anyone works with it and suggest improvements. But, is it supported by major browsers? Going to CanIUse gives answer that not:


(support details are on 2018/01/21, it could be changed over time)

It is supported by Chrome, Opera, Chrome for Android. Safari and Firefox are experimenting(not supported yet) with supporting WebP images. IE and Edge doesn’t support it.
But how it can be used now, when not all browsers support it? Each browser(web client) provides Accept header when getting resources from server. If this header contains image/webp, web server know that it can returns WebP format. As example Akamai CDN use this behavior. It can return optimized WebP images for web clients who support it and JPEG and PNG for those who doesn’t support.
Let’s consider how it could be used in Sitecore. It has no sense to add support of WebP format to media library for now, we can’t return this file format to all web clients. But it makes sense to return WebP format to web clients that can use it. Saving about 25% of time on loading images can make big difference for user experience, especially on mobile. I decided don’t write new image optimizer from the scratch and add support of WebP to well known tool for images optimization for the Sitecore: Dianoga.
To make it works, we should get understanding how Sitecore Media Library and Sitecore Media Library cache work. Sitecore media library creates files on disk after each request, or uses previously created files. By default these files are located under \Website\App_Data\MediaCache\website\{some folders}. There are few files in each folder. First type of files is cache for image. It is image itself, Sitecore don’t need to preprocess width, height and other parameters for each media request. It does processing only once. Second type of files is .ini file, it is metadata for cached object. Metadata contains next values:
Key. e.g. ?as=False&bc=0&h=0&iar=False&mh=0&mw=0&sc=0&thn=False&w=0. Key contains all media query parameters.
Extension - extension of file.
Headers - cached headers that should be returned to web client
DataFile - file name of object that should be returned to web client.

We need to extend forming of key, to add one more parameter that will indicate support of WebP format. It will require extending of MediaRequestHandler:

public class MediaRequestHandler : Sitecore.Resources.Media.MediaRequestHandler
{
 protected override bool DoProcessRequest(HttpContext context, MediaRequest request, Media media)
 {
  if (context?.Request.AcceptTypes != null && (context.Request.AcceptTypes).Contains("image/webp"))
  {
   request.Options.CustomOptions["extension"] = "webp";
  }

  return base.DoProcessRequest(context, request, media);
 }

 private static bool AcceptWebP(HttpContext context)
 {
  return context?.Request.AcceptTypes != null && (context.Request.AcceptTypes).Contains("image/webp");
 }
}

Our key will contain one more additional parameter: extension. E.g.: ?as=False&bc=0&h=0&iar=False&mh=0&mw=0&sc=0&thn=False&w=0&extension=webp
Let’s add handler that will process WebP compatible requests based on
CommandLineToolOptimizer:

public class WebPOptimizer : CommandLineToolOptimizer
{
 public override void Process(OptimizerArgs args)
 {
  //If WebP optimization was executed then abort running other optimizers
  //because they don't accept webp input file format
  if (args.AcceptWebP)
  {
   base.Process(args);
   args.AbortPipeline();
  }
 }

 protected override string CreateToolArguments(string tempFilePath, string tempOutputPath)
 {
  return $"\"{tempFilePath}\" -o \"{tempOutputPath}\" ";
 }
}

It is very easy, it runs cwebp.exe tool that converts JPEG or PNG to WebP. It doesn’t utilize all available command line options, and could be tuned depending on requirements. All others code changes are more about Dianoga configuration and unit tests, I will not stop on them in this article. If you want more details, you can review all changes in GitHub repository.

How to enable Dianoga WebP support for your project:
  1. Clone GitHub repository and build project
  2. Enable Dianoga.WebP.config.disabled config
  3. Open web.config and change line <add verb="*" path="sitecore_media.ashx" type="Sitecore.Resources.Media.MediaRequestHandler, Sitecore.Kernel" name="Sitecore.MediaRequestHandler" /> to <add verb="*" path="sitecore_media.ashx" type="Dianoga.MediaRequestHandler, Dianoga" name="Sitecore.MediaRequestHandler" />
  4. If you have custom MediaRequestHandler (e.g. Habitat is used) then skip step 3 and override DoProcessRequest method with detection of support of WebP format. See MediaRequestHandler code listening above.

P.S. It is experimental feature, use it on your own risk. :-)

Use of Solr Search Provider in Sitecore

It is a copy of this blog post to have all my Sitecore articles in one place.

Usage of Solr search provider on Sitecore solutions becomes more and more popular. Solr is built over Lucene and provides additional abilities. Comparing with Lucene, it's server based:

  • You don’t have a separate index for each CM/CD server, you don’t have problems with indexes sync on different machines
  • CD servers doesn’t do indexes build, it frees server resources
  • You are able to scale your search servers
  • The more big your Sitecore solution is, the more probability is that you will use Solr provider.

Out of the box, Sitecore provides three types of Solr indexes: SolrSearchIndex, SwitchOnRebuildSolrSearchIndex and SwitchOnRebuildSolrCloudSearchIndex. SwitchOnRebuildSolrSearchIndex is built under top of SolrSearchIndex. SwitchOnRebuildSolrCloudSearchIndex is built under top of SwitchOnRebuildSolrSearchIndex. Why do you need different implementation? Answer is simple: SwitchOnRebuildSolrSearchIndex solves big problem of SolrSearchIndex: After start of index rebuild on SolrSearchIndex you temporarily get empty index. It causes seeing no search results by user during index rebuild.


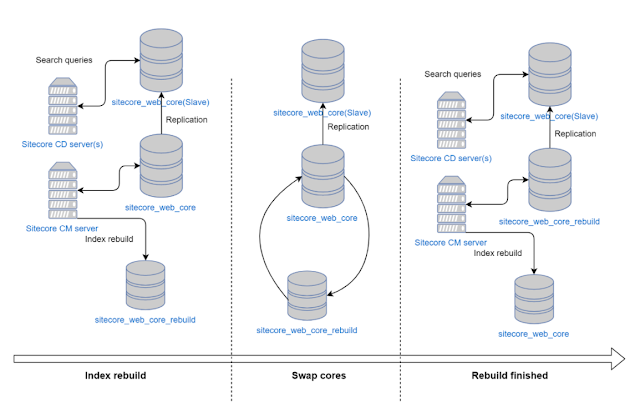
SwitchOnRebuildSolrSearchIndex solves this problem by having 2 cores: one core is used during index rebuild, cores are swapped after rebuild, second core started to used after rebuild. It causes 2 requirements: having different core per index and double amount Solr cores. Swap atomically swaps the names used to access two existing cores. The prior core remains available and can be swapped back, if necessary. Each core will be known by the name of the other, after the swap.


Note: names of cores remains unchanged. Changing of places “sitecore_web_core” and “sitecore_web_core_rebuild” are only for highlighting that content of the core was changed by swap.

But what is happening when we are starting to use few SOLR servers: master and slave:


From diagram above we can make conclusion, that having “rebuild” cores could be redundant. And usage of SwitchOnRebuildSolrSearchIndex could be replaced with SolrSearchIndex, but we should disable replication during index rebuild. It could be easily done adding two Sitecore events:
Disabling replication on indexing:start. (if it is full index rebuild, not incremental)
Enabling replication on indexing:end. (if it is full index rebuild, not incremental)

Both these event handlers do web request to Solr server:

  • http://master_host:port/solr/replication?command=disablereplication
  • http://master_host:port/solr/replication?command=enablereplication

There is one un-obvious thing that you should have in mind: indexing:end event could be called when server is shutting down. It is necessary to check if server is not shutting down before enabling replication.

Now we get simpler process and possibility to use SolrSearchIndex.


Conclusion: when you have few Solr instances (Master/Slave) on Sitecore environments then you can use SolrSearchIndex and enabling/disabling replication instead of SwitchOnRebuildSolrSearchIndex.

Friday, February 3, 2017

Return MouseWheel Event to Sitecore 8+ Ribbon

Do you know that there was  nice feature in Sitecore 6 - 7.2 that allows use mouse scroll on Content Editor Ribbon?

Once working on project based on Sitecore 7.2 I accidentally scrolls mouse wheel when cursor was on Content Editor ribbon. Sitecore behavior surprised me: it switched to the next Content Editor tab. I found it nice useful feature that speed up work in Content Editor, especially when you are looking for some button and forgot where it is located. It saves time and nerves and I used to utilize this feature day to day.

But, when I switched to project based on Sitecore 8, I was disappointed. Scroll doesn't work on ribbon any more... And I decided return this feature into Sitecore and even a little bit improve it.

All that you need, find \sitecore\shell\Applications\Content Manager\Content Editor.js file and put this JavaScript to the end:

jQuery(document).ready(function () {
    jQuery("#RibbonPanel").bind("mousewheel", function (event) {
        var array = jQuery(event.currentTarget).find(".scRibbonNavigatorButtonsGroupButtons a");
        if (array.length > 1) {
            var active = jQuery(event.currentTarget).find(".scRibbonNavigatorButtonsGroupButtons a.scRibbonNavigatorButtonsActive");
            var index = array.index(active);
            var delta = (event.originalEvent.wheelDelta > 0 ? 1 : -1);
            if (index === array.length - delta) {
                if (delta < 0) {
                    array[0].click();
                }
                else {
                    array[1].click();
                }
            }
            else {
                if (index === 0) {
                    array.last().click();
                }
                else {
                    array[index + delta].click();
                }
            }
        }
    });
});

Voila, you can use scroll for ribbon navigation again!


Wednesday, January 4, 2017

Sitecore Log4Net Appender for Slack


    Slack became essential part of almost all projects(or teams). It is very powerful communication tool that speed up sharing information. As we use Slack for our Sitecore-based project I decided to create prototype of slack bot that will share information about Sitecore production site health to Slack channel. 


    After quick search I found that something similar was already created on Sitecore Hackathon, named Slack for Sitecore. There is also video that describe how it works.

    But as for me, it is too complex to use it in real projects. You don't need to have a lot of information in Slack channel, otherwise you will skip all messages from Slack bot. And also you don't need to spend a time on configuration of module. Sitecore already has mechanism how to show that something went wrong - logging errors to log file. Why don't use it for our Slack bot?

    First of all, we should take Slack log4net appender and change it to be suitable for Sitecore. It could be done quite easily by changing dependency from log4net assembly to Sitecore.Logging assembly.

    Now, we are able to add log4slack appender to our Sitecore configuration:

<appender name="SlackAppender"
    type="Log4Slack.SlackAppender, Log4Slack">
  <WebhookUrl value="https://hooks.slack.com/**********************" />
  <Channel value="#testing" />
  <Username value="*********" />
  <IconUrl value="" />
  <IconEmoji value=":ghost:" />
  <AddAttachment value="true" />
  <AddExceptionTraceField value="true" />
  <UsernameAppendLoggerName value="true"/>
  <threshold value="Error" />
</appender>
....
<root>
  <priority value="INFO"/>
  <appender-ref ref="LogFileAppender"/>
  <appender-ref ref="SlackAppender"/>
</root>

   And we got next messages in our Slack channel:

    Of course, you don't need having all logs to be transferred to your Slack channel, because no one will read them. That is why you either should set up separate logger for critical messages or set logging level for this appender to error: <threshold value="Error" />. And you will not miss any critical exception on your site.