Wednesday, April 11, 2018

Use of Solr Search Provider in Sitecore

It is a copy of this blog post to have all my Sitecore articles in one place.

Usage of Solr search provider on Sitecore solutions becomes more and more popular. Solr is built over Lucene and provides additional abilities. Comparing with Lucene, it's server based:

  • You don’t have a separate index for each CM/CD server, you don’t have problems with indexes sync on different machines
  • CD servers doesn’t do indexes build, it frees server resources
  • You are able to scale your search servers
  • The more big your Sitecore solution is, the more probability is that you will use Solr provider.

Out of the box, Sitecore provides three types of Solr indexes: SolrSearchIndex, SwitchOnRebuildSolrSearchIndex and SwitchOnRebuildSolrCloudSearchIndex. SwitchOnRebuildSolrSearchIndex is built under top of SolrSearchIndex. SwitchOnRebuildSolrCloudSearchIndex is built under top of SwitchOnRebuildSolrSearchIndex. Why do you need different implementation? Answer is simple: SwitchOnRebuildSolrSearchIndex solves big problem of SolrSearchIndex: After start of index rebuild on SolrSearchIndex you temporarily get empty index. It causes seeing no search results by user during index rebuild.
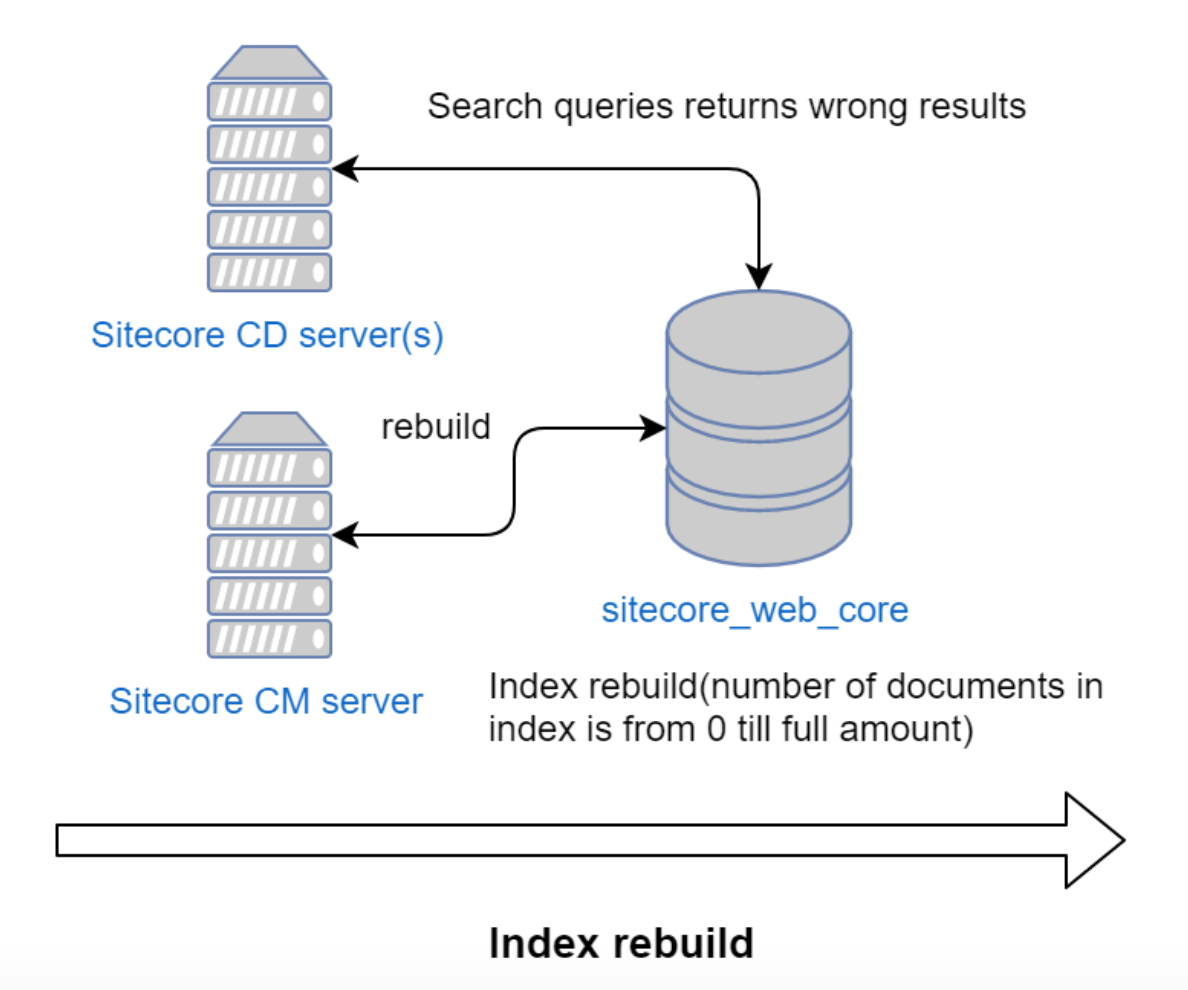


SwitchOnRebuildSolrSearchIndex solves this problem by having 2 cores: one core is used during index rebuild, cores are swapped after rebuild, second core started to used after rebuild. It causes 2 requirements: having different core per index and double amount Solr cores. Swap atomically swaps the names used to access two existing cores. The prior core remains available and can be swapped back, if necessary. Each core will be known by the name of the other, after the swap.


Note: names of cores remains unchanged. Changing of places “sitecore_web_core” and “sitecore_web_core_rebuild” are only for highlighting that content of the core was changed by swap.

But what is happening when we are starting to use few SOLR servers: master and slave:


From diagram above we can make conclusion, that having “rebuild” cores could be redundant. And usage of SwitchOnRebuildSolrSearchIndex could be replaced with SolrSearchIndex, but we should disable replication during index rebuild. It could be easily done adding two Sitecore events:
Disabling replication on indexing:start. (if it is full index rebuild, not incremental)
Enabling replication on indexing:end. (if it is full index rebuild, not incremental)

Both these event handlers do web request to Solr server:

  • http://master_host:port/solr/replication?command=disablereplication
  • http://master_host:port/solr/replication?command=enablereplication

There is one un-obvious thing that you should have in mind: indexing:end event could be called when server is shutting down. It is necessary to check if server is not shutting down before enabling replication.

Now we get simpler process and possibility to use SolrSearchIndex.


Conclusion: when you have few Solr instances (Master/Slave) on Sitecore environments then you can use SolrSearchIndex and enabling/disabling replication instead of SwitchOnRebuildSolrSearchIndex.

Friday, February 3, 2017

Return MouseWheel Event to Sitecore 8+ Ribbon

Do you know that there was  nice feature in Sitecore 6 - 7.2 that allows use mouse scroll on Content Editor Ribbon?

Once working on project based on Sitecore 7.2 I accidentally scrolls mouse wheel when cursor was on Content Editor ribbon. Sitecore behavior surprised me: it switched to the next Content Editor tab. I found it nice useful feature that speed up work in Content Editor, especially when you are looking for some button and forgot where it is located. It saves time and nerves and I used to utilize this feature day to day.

But, when I switched to project based on Sitecore 8, I was disappointed. Scroll doesn't work on ribbon any more... And I decided return this feature into Sitecore and even a little bit improve it.

All that you need, find \sitecore\shell\Applications\Content Manager\Content Editor.js file and put this JavaScript to the end:

jQuery(document).ready(function () {
    jQuery("#RibbonPanel").bind("mousewheel", function (event) {
        var array = jQuery(event.currentTarget).find(".scRibbonNavigatorButtonsGroupButtons a");
        if (array.length > 1) {
            var active = jQuery(event.currentTarget).find(".scRibbonNavigatorButtonsGroupButtons a.scRibbonNavigatorButtonsActive");
            var index = array.index(active);
            var delta = (event.originalEvent.wheelDelta > 0 ? 1 : -1);
            if (index === array.length - delta) {
                if (delta < 0) {
                    array[0].click();
                }
                else {
                    array[1].click();
                }
            }
            else {
                if (index === 0) {
                    array.last().click();
                }
                else {
                    array[index + delta].click();
                }
            }
        }
    });
});

Voila, you can use scroll for ribbon navigation again!


Wednesday, January 4, 2017

Sitecore Log4Net Appender for Slack


    Slack became essential part of almost all projects(or teams). It is very powerful communication tool that speed up sharing information. As we use Slack for our Sitecore-based project I decided to create prototype of slack bot that will share information about Sitecore production site health to Slack channel. 


    After quick search I found that something similar was already created on Sitecore Hackathon, named Slack for Sitecore. There is also video that describe how it works.

    But as for me, it is too complex to use it in real projects. You don't need to have a lot of information in Slack channel, otherwise you will skip all messages from Slack bot. And also you don't need to spend a time on configuration of module. Sitecore already has mechanism how to show that something went wrong - logging errors to log file. Why don't use it for our Slack bot?

    First of all, we should take Slack log4net appender and change it to be suitable for Sitecore. It could be done quite easily by changing dependency from log4net assembly to Sitecore.Logging assembly.

    Now, we are able to add log4slack appender to our Sitecore configuration:

<appender name="SlackAppender"
    type="Log4Slack.SlackAppender, Log4Slack">
  <WebhookUrl value="https://hooks.slack.com/**********************" />
  <Channel value="#testing" />
  <Username value="*********" />
  <IconUrl value="" />
  <IconEmoji value=":ghost:" />
  <AddAttachment value="true" />
  <AddExceptionTraceField value="true" />
  <UsernameAppendLoggerName value="true"/>
  <threshold value="Error" />
</appender>
....
<root>
  <priority value="INFO"/>
  <appender-ref ref="LogFileAppender"/>
  <appender-ref ref="SlackAppender"/>
</root>

   And we got next messages in our Slack channel:

    Of course, you don't need having all logs to be transferred to your Slack channel, because no one will read them. That is why you either should set up separate logger for critical messages or set logging level for this appender to error: <threshold value="Error" />. And you will not miss any critical exception on your site.

Wednesday, December 28, 2016

Extension of Sitecore Log Abilities

    Sitecore have an ample capabilities on logging. All logging system is based on log4net services. And if you need to change destination of your logs all that you need – configure right log appender. There is wide range of log4net appenders available out of the box. And also big amount of open source modules that you are able to fit for your needs. For example:
  1. You can write your logs in MongoDB. 
  2. You can create Slack bot that will put logs in Slack channel. 
  3. Use ElasticSearch+LogStash+Kibana(or RabbitMQ) 
     
    But there are few peculiar properties that doesn’t allow to use major appenders out of the box. Log4net web.config configuration section in Sitecore is initialized by Sitecore.Logging (not by log4net.dll) assembly and it requres additional steps. Sitecore.Logging is extended copy of log4net assembly. Even namespaces are same! While fitting new appender to Sitecore your appender should be inherited from log4net.Appender.AppenderSkeleton. Take into account that class with same namespace is present in both log4net.dll and Sitecore.Logging.dll. You need to use class from Sitecore.Logging.dll !!!

To summarize, list of steps of fitting new appender to Sitecore will be next:
  1. Get sources of appender 
  2. Add reference to Sitecore.Logging assembly with alias Sitecore for ability to use log4net and Sitecore.Logging in same project 
  3. Inherit your appender from Sitecore.Logging AppenderSkeleton class implementation MyAppender : Sitecore::log4net.Appender.AppenderSkeleton 
  4. Implement missed class members: you need to reimplement Append method. It has different signature comparing to default one Append(Sitecore::log4net.spi.LoggingEvent loggingEvent) 

Tuesday, July 19, 2016

Sitecore ExM in Depth: How Sitecore Email Experience Manager Determine If Message Was Opened

When you look at source of html email message that was delivered by Sitecore Email Experience Manager you see strange image tag that is located before closing BODY and HTML tags:

<img height="1" width="1" border="0" style="border-color: transparent;" src="http://your.host/sitecore/RegisterEmailOpened.aspx?ec_contact_id=3D0A4C096C4287C4C50A33E8BB5DB87E04&ec_message_id=3D16BE08364227=4836B57FB8CDCEB15C85" />

It is service ExM tag that is inserted to all email. This image tag has source property link to service ExM page: RegisterEmailOpened.aspx. And as parameters are transferred IDs of contact and email. When your mail agent(or browser) tries to load this image it sends request to Sitecore server and triggers event about email opening. Of course it will not work for all mail clients and web mail portals, but it is still good way to get more information about behavior of email recipients. (One of reasons could be not downloading images by default. It is frequent setting for mobile mail agents.)


Sitecore ExM in Depth: Hard and Soft Bounce Detection Facts


There are few facts about soft and hard bounce detection that are not obvious and need your attention,when you try to get messages appeared in "Hard Bounce" or "Soft Bounce" engagement analytics states:
  • ExM version is up to 3.2.1 bounce detection works only when messages delivery is performed via Sitecore AppCenter. Setting UseLocalMTA determine if Sitecore MTA(mail transfer agent) should be used. When setting UseLocalMTA is equal true and your  then you will not be able to get hard and soft bounce messages states.
  • Starting from Sitecore Email Experience Manager 3.3 you are able to detect bounces with your local MTA. 
  • Bounce detection is performed by scheduled task: /sitecore/system/Modules/E-mail Campaign Manager/Instance Tasks/Content Management Primary/Check Bounced Messages. Default interval between running of task is 12 hours 30 minutes. Be patient: contacts will not appear immediately in  hard and soft bounce states.
  • Easiest way to check if latest bounce detection was success is to check Items field of Check Bounced Messages scheduled task. It should contain time stamp of latest success bounce detection. If  latest bounce detection was failed this field will contain "1/1/0001 12:00:00 AM" or empty string.
  • Bounce detection is performed via request to Sitecore App Center service.

Monday, June 20, 2016

Sitecore "Schedule" Field in Depth

All Sitecore Schedule tasks have Schedule field that correspond for setting up interval of running tasks.
It is quite intuitive, especially when you will read description. It has format {0}|{1}|{2}|{3}.
Where:
  1. Date stamp when task running should be started. 
  2. Date stamp when task running should be ended.
  3. Days of week when task should be run.
  4. Time span interval how often task should be run.
All of components of this string have clear format, except third. Let's look  how it works. Under hood third component is cast to DayOfWeek enum.

public enum DaysOfWeek
{
 None = 0,
 Sunday = 1,
 Monday = 2,
 Tuesday = 4,
 Wednesday = 8,
 Thursday = 16,
 Friday = 32,
 Saturday = 64
}

And value that you should indicate days of week when schedule should be run is sum of this components. E.g.: task that should be run on Monday and Thursday. 2 +16 = 18. (indeed there is binary operation OR of 100 and 100000 values, but you can use decimal system for simplifying ).

It could take some time to get this value in head when you don't work with schedule field day to day. That is why I prepared script that will calculate this value for you:


P.S. Another good option is Sitecore Shell Wax shared source module. If Content Managers do changing of scheduled tasks day to day - it is better option to use this module.